在本指南中,我们将安装和保护phpMyAdmin并使其在Ubuntu Server 20.04上与Apache一起使用。 先决条件 您应该使用具有sudo特权的非root用户,如Ubuntu 20.04 Initial Server…
如何在Ubuntu 20.04/20.10上为Apache安装Let’s Encrypt SSL证书, How To Install a Let’s Encrypt SSL Cert for Apache on Ubuntu 20.04
先决条件
您应该使用具有sudo特权的非root用户,如 Ubuntu 20.04 Initial Server Setup中所述。
在继续本指南之前,您还应该已经安装了Apache并且可以提供Web页面。请参阅在Ubuntu 20.04上安装Apache。
Cloudflare用户:请注意,您可能不需要Let’s Encrypt,而可以使用Cloudflare自己的共享Universal SSL证书和OriginCA。如果要保留Cloudflare并使用“加密”,则必须立即暂停 Cloudflare,否则会干扰证书部署。部署“让我们加密”证书后,您必须在Cloudflare加密设置中取消暂停并将SSL设置为“完全(严格) ”,否则可能会收到重定向循环错误。请注意,当“加密”尝试在90天后自动续订时,如果启用了Cloudflare,它将失败。
1.安装“让我们加密客户端”(Certbot)
让我们首先更新安装Certbot的软件包列表。键入y,ENTER如果出现提示。
sudo apt update && sudo apt install certbot python-certbot-apache
如果出现错误“ python-certbot-apache没有安装候选程序”,或者报错:“Unable to locate package python-certbot-apache”
请尝试运行
sudo apt install certbot python3-certbot-apache
2.获取SSL证书
前提是要设置好子域名:
sudo cp /etc/apache2/sites-available/000-default.conf  /etc/apache2/sites-available/000-default.conf.bak
sudo vi /etc/apache2/sites-available/000-default.conf
现在,我们将为我们的测试域example.com获取证书。Certbot有一个Apache插件,可以自动执行证书安装。
sudo certbot --apache
Enter email address (used for urgent renewal and security notices) (Enter 'c' to
cancel):
输入电子邮件地址,以便在紧急更新和安全通知时与您联系。
Please read the Terms of Service at
https://letsencrypt.org/documents/LE-SA-v1.2-November-15-2017.pdf. You must
agree in order to register with the ACME server at
https://acme-v02.api.letsencrypt.org/directory
-------------------------------------------------------------------------------
(A)gree/(C)ancel:
按 a 和 ENTER 同意服务条款。
Would you be willing to share your email address with the Electronic Frontier
Foundation, a founding partner of the Let's Encrypt project and the non-profit
organization that develops Certbot? We'd like to send you email about EFF and
our work to encrypt the web, protect its users and defend digital rights.
-------------------------------------------------------------------------------
(Y)es/(N)o:
按 n 和 ENTER 不与EFF分享您的电子邮件地址。
Which names would you like to activate HTTPS for?
- - - - - - - - - - - - - - - - - - - - - - - - - - - - - - - - - - - - - - - -
1: example.com
2: www.example.com
- - - - - - - - - - - - - - - - - - - - - - - - - - - - - - - - - - - - - - - -
Select the appropriate numbers separated by commas and/or spaces, or leave input
blank to select all options shown (Enter 'c' to cancel):
如果您的服务器上已经配置了多个域,则将在此处看到它们的列表。在此示例中,我们只有一个域example.com及其www。字首。
1如果您不想使用www,请选择选项。在您的网站地址中添加前缀,否则请选择option 2。
Obtaining a new certificate
Performing the following challenges:
http-01 challenge for example.com
Waiting for verification...
Cleaning up challenges
Created an SSL vhost at /etc/apache2/sites-available/example.com-le-ssl.conf
Enabled Apache socache_shmcb module
Enabled Apache ssl module
Deploying Certificate to VirtualHost /etc/apache2/sites-available/example.com-le-ssl.conf
Enabling available site: /etc/apache2/sites-available/example.com-le-ssl.conf

Please choose whether or not to redirect HTTP traffic to HTTPS, removing HTTP access.
- - - - - - - - - - - - - - - - - - - - - - - - - - - - - - - - - - - - - - - -
1: No redirect - Make no further changes to the webserver configuration.
2: Redirect - Make all requests redirect to secure HTTPS access. Choose this for
new sites, or if you're confident your site works on HTTPS. You can undo this
change by editing your web server's configuration.
- - - - - - - - - - - - - - - - - - - - - - - - - - - - - - - - - - - - - - - -
Select the appropriate number [1-2] then [enter] (press 'c' to cancel):
按2和ENTER将所有流量重定向到HTTPS。
Redirecting vhost in /etc/apache2/sites-enabled/example.com.conf to ssl vhost in /etc/apache2/sites-available/example.com-le-ssl.conf

- - - - - - - - - - - - - - - - - - - - - - - - - - - - - - - - - - - - - - - -
Congratulations! You have successfully enabled https://example.com

You should test your configuration at:
https://www.ssllabs.com/ssltest/analyze.html?d=example.com
- - - - - - - - - - - - - - - - - - - - - - - - - - - - - - - - - - - - - - - -
你完成了!
3.测试SSL
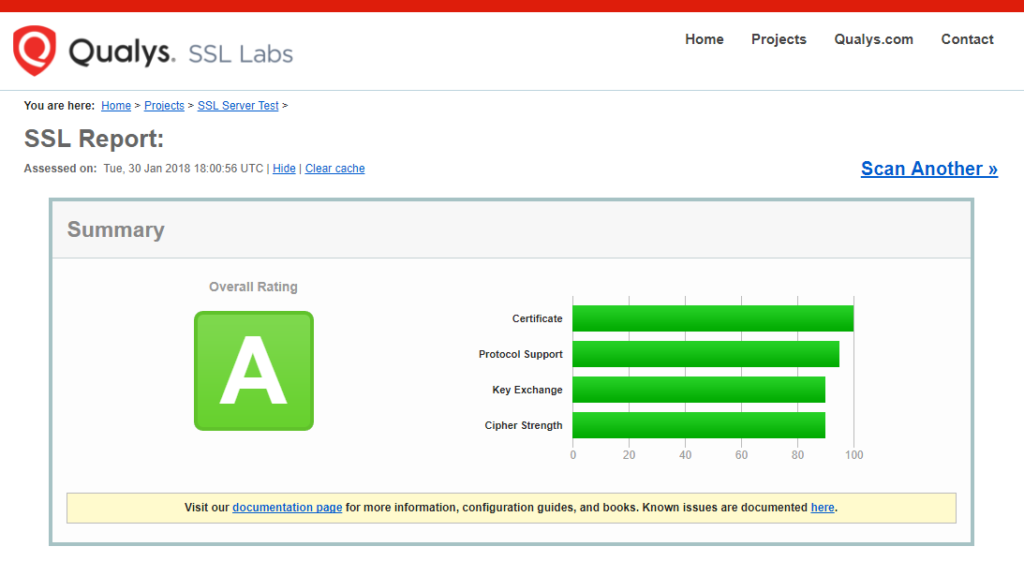
现在,您可以转到 ssllabs.com/ssltest/ 并在您的域上运行SSL测试。
成功的测试应获得A级。

4.自动续约更新
由于“让我们加密”证书在90天后过期,因此需要定期检查它们的续订时间。Certbot将每天自动运行两次,并在到期后三十天内续订任何证书。
要测试此续订过程是否正常运行,可以运行:
sudo certbot renew --dry-run
要自动续订我们的加密证书,只需编辑root用户的crontab文件。
sudo crontab -e
然后在底部添加以下行。
0 0,12 * * * /usr/bin/certbot renew --quiet > /dev/null
Cloudflare用户
请确保您的Cloudflare SSL设置正确。登录到Cloudflare,转到“ 加密” ,并确保SSL设置为“ 完全(严格)”。请注意,当“加密”尝试在90天后自动续订时,如果启用了Cloudflare,它将失败。
更多更新,查看官网:https://certbot.eff.org/lets-encrypt/ubuntufocal-apache
关于报错
- Another instance of Certbot is already running
ps -ef | grep certb # kill {id} - 删除之前的证书 Delete a Certbot SSL Certificate
$ sudo certbot delete
- 按装域名删除证书 Delete Certbot Certificate by Domain Name
$ sudo certbot delete --cert-name example.com
![]()


