Validus A dead simple Python data validation library.…
December 12, 2019
Python: SeleniumBase测试自动化, Web测试框架SeleniumBase, SeleniumBase 实例用法, SeleniumBase 模拟登录, SeleniumBase 入门
源代码名称:SeleniumBase
Github地址:https://github.com/seleniumbase/SeleniumBase
SeleniumBas源代码文档 : http://www.github.com/seleniumbase/SeleniumBase/wiki
SeleniumBase源代码下载 : http://www.github.com/seleniumbase/SeleniumBase/releases
功能:
- 支持 python 库帮助你构建可靠的脚本。 ( python 2.7或者 3.3 + )
- 命令行选项和一个全局配置文件,用于定制运行。
- 用于记录数据&屏幕截图的插件插件。
- 适用于 selenium 网格,MySQL,Docker 插件,NodeJS插件,Google云插件,AWS。
- ( 请参见更多SeleniumBase功能插件)
首先,SeleniumBase支持 pip安装:
# 添加 --upgrade 或者  -U  用于升级
# 添加 --force-reinstall 重新安装
pip install seleniumbase
它依赖的库比较多,包括pytest、nose这些第三方单元测试框架,是为更方便的运行测试用例,因为这两个测试框架是支持unittest测试用例的执行的。
SeleniumBase还生成了 “seleniumbase”命令,主要是为了方便我们安装浏览器驱动。
# seleniumbase install chromedriver latest 安装最新版
seleniumbase install chromedriver

# The file [chromedriver] was saved to:
# /usr/local/lib/python3.6/dist-packages/seleniumbase/drivers/chromedriver

# 安装其他浏览器驱动
#seleniumbase install chromedriver
#seleniumbase install geckodriver
#seleniumbase install edgedriver
#seleniumbase install iedriver
#seleniumbase install operadriver
你可以通过下面的命令安装不同的浏览器驱动。
在项目的examples/目录下面提供了丰富的例子。其中my_first_test.py如下:
from seleniumbase import BaseCase


class MyTestClass(BaseCase):

    def test_basic(self):
        self.open("https://xkcd.com/353/")
        self.assert_element('img[alt="Python"]')
        self.click('a[rel="license"]')
        self.assert_text("free to copy", "div center")
        self.open("https://xkcd.com/1481/")
        title = self.get_attribute("#comic img", "title")
        self.assert_true("86,400 seconds per day" in title)
        self.click("link=Blag")
        self.assert_text("The blag of the webcomic", "h2")
        self.update_text("input#s", "Robots!\n")
        self.assert_text("Hooray robots!", "#content")
        self.open("https://xkcd.com/1319/")
        self.assert_exact_text("Automation", "#ctitle")
如果你很熟悉Selenium的话,我想这些API对你来说并没什么难度。( 默认情况下,CSS选择器用于查找页面元素。)
接下来是脚本的执行,你可以使用pytest或nose,因为SeleniumBase已经帮你装好了:
pytest my_first_test.py --browser=chrome
nosetests my_first_test.py --browser=firefox

# 默认是无头 --headless 运行,如果想要显示浏览器的话,可以用:
pytest my_first_test.py  --headed
它还提供的有 —demo_mode 模式,使脚本执行的过程变得很慢,而且还会让操作的元素高亮显示,方便你查看和定位问题。
pytest my_first_test.py --demo_mode

你可以通过更新 settings.py 或者在使用演示模式时使用 --demo_sleep={NUM} 来覆盖默认等待时间。 ( 注意:如果你使用 --demo_sleep={NUM} 而不使用 --demo_mode,则不会发生任何
如果你对 settings.py的本地副本进行了更改,则可能需要运行 python setup.py develop 才能使这些更改生效。
nosetests my_first_test.py --with-selenium --browser=chrome --demo_mode --demo_sleep=1.2
你还可以在脚本中使用以下方法来降低测试速度:
import time; time.sleep(5)
# sleep for 5 seconds (add this after the line you want to pause on)import ipdb; ipdb.set_trace()
# waits for your command. n = next line of current method, c = continue, s = step/next executed line (will jump)
如果使用pytest而不是 nosetests,希望在脚本中使用ipdb进行调试,则需要在 命令行 中添加 --capture=no,或者使用 import pytest; pytest.set_trace() 代替 ipdb。 更多关于这个的信息。)
你可以能还希望在它的他情况下使测试等待某些情况下进行测试睡眠。 如果你知道正在等待的内容,应该通过使用等待某些特定事件的命令来确定。
如果你需要在 fly ( 出现错误时) debug调试东西,请使用以下命令:
nosetests my_first_test.py --browser=chrome --with-selenium --pdb --pdb-failures -s
上面 代码( 使用 –pdb ) 将保留你的浏览器窗口打开,如果出现故障,则可能会更改页面上显示的数据。 ( ipdb命令:’c’,’s’,’n’=>,步骤,下一步)。 你可能需要 -s 来查看所有控制台输出。
以下是附加到运行命令的一些有用的nosetest参数:
--logging-level=INFO
# Hide DEBUG messages, which can be overwhelming.-x
# Stop running the tests after the first failure is reached.-v
# Prints the full test name rather than a dot for each test.--with-id
# If -v is also used, will number the tests for easy counting.
--with-testing_base 插件提供了测试失败的完整日志,它将屏幕截图,页面源和基本测试信息保存到日志文件夹中:
cd examples/
pytest my_first_test.py --with-testing_base --browser=firefox
pytest my_first_test.py --with-testing_base --browser=chrome
注意:在使用 new/pytest 在新文件夹结构的基础上,你需要使用 pytest.ini 来运行测试。
在调试Selenium脚本的时候,我们希望错误时可以暂停脚本,那么可以加 --pdb -s 参数。
pytest my_first_test.py --pdb -s
当脚本报错时是这样的:

上面的代码将使浏览器窗口保持打开状态,以防出现故障。你可以继续输入命令:
“c”:继续
“s”:步骤
“n”: 下一步
你还可以利用pytest 的 pytest-thml插件生成测试报告。
pytest test_suite.py --html=report.html
当用例运行失败时自动截图!

Nosetest报告:
--report 选项在测试套件完成后给你一个漂亮的报告。 ( 当 --report 被使用时也需要设置 --with-testing_base,因为它是插件的一部分。)
nosetests my_test_suite.py --with-selenium --with-testing_base --report

( 注意:你可以添加 --show_report 在测试套件完成后立即显示Nosetest报告。 在本地运行测试时只使用 --show_report,因为它暂停了测试运行。
模拟登录

(Above: test_swag_labs.py from examples/ in Demo Mode.)
from seleniumbase import BaseCase


class SwagLabsTests(BaseCase):

    def login(self, user="standard_user"):
        """ Login to Swag Labs and assert that the login was successful. """
        if user not in (["standard_user", "problem_user"]):
            raise Exception("Invalid user!")
        self.open("https://www.saucedemo.com/")
        self.update_text("#user-name", user)
        self.update_text("#password", "secret_sauce")
        self.click('input[type="submit"]')
        self.assert_element("#inventory_container")
        self.assert_text("Products", "div.product_label")

    def test_swag_labs_basic_flow(self):
        """ This test checks for basic functional flow in the Swag Labs store.
            The test is parameterized, and receives the user to use for login.
        """
        self.login()

        # Verify that the "Test.allTheThings() T-Shirt" appears on the page
        item_name = "Test.allTheThings() T-Shirt"
        self.assert_text(item_name)

        # Verify that a reverse-alphabetical sort works as expected
        self.select_option_by_value("select.product_sort_container", "za")
        if item_name not in self.get_text("div.inventory_item"):
            raise Exception('Sort Failed! Expecting "%s" on top!' % item_name)

        # Add the "Test.allTheThings() T-Shirt" to the cart
        self.assert_exact_text("ADD TO CART", "button.btn_inventory")
        item_price = self.get_text("div.inventory_item_price")
        self.click("button.btn_inventory")
        self.assert_exact_text("REMOVE", "button.btn_inventory")
        self.assert_exact_text("1", "span.shopping_cart_badge")

        # Verify your cart
        self.click("#shopping_cart_container path")
        self.assert_exact_text("Your Cart", "div.subheader")
        self.assert_text(item_name, "div.inventory_item_name")
        self.assert_exact_text("1", "div.cart_quantity")
        self.assert_exact_text("REMOVE", "button.cart_button")
        self.assert_element("link=CONTINUE SHOPPING")

        # Checkout - Add info
        self.click("link=CHECKOUT")
        self.assert_exact_text("Checkout: Your Information", "div.subheader")
        self.assert_element("a.cart_cancel_link")
        self.update_text("#first-name", "SeleniumBase")
        self.update_text("#last-name", "Rocks")
        self.update_text("#postal-code", "01720")

        # Checkout - Overview
        self.click("input.btn_primary")
        self.assert_exact_text("Checkout: Overview", "div.subheader")
        self.assert_element("link=CANCEL")
        self.assert_text(item_name, "div.inventory_item_name")
        self.assert_text(item_price, "div.inventory_item_price")
        self.assert_exact_text("1", "div.summary_quantity")

        # Finish Checkout and verify item is no longer in cart
        self.click("link=FINISH")
        self.assert_exact_text("THANK YOU FOR YOUR ORDER", "h2")
        self.assert_element("div.pony_express")
        self.click("#shopping_cart_container path")
        self.assert_element_absent("div.inventory_item_name")
        self.click("link=CONTINUE SHOPPING")
        self.assert_element_absent("span.shopping_cart_badge")
cd examples
pytest test_swag_labs.py --demo
以下是Pytest随附的一些其他有用的命令行选项:
-v   #打印每个测试的完整测试名称。
-q   #运行测试时,在控制台输出中打印较少的详细信息。
-x   #达到第一个失败后停止运行测试。
--html = report.html   #测试完成后创建详细的pytest-html报告。
--collect-only   #显示将在不实际运行的情况下运行哪些测试。
-s   #参见打印语句。(默认情况下应启用pytest.ini。)
-n = NUM   #使用那么多线程对测试进行多线程处理。(加快测试速度!)
SeleniumBase为测试提供了其他Pytest命令行选项:
--browser=BROWSER  # (使用的Web浏览器。)
--cap-file=FILE  # (使用的Web浏览器所需的功能。)
--settings-file=FILE  # (覆盖SeleniumBase settings.py值。)
--env=ENV  # (设置测试环境。在测试中使用“ self.env”。)
--data=DATA  # (要传递给测试的其他数据。在测试中使用“ self.data”。)
--user-data-dir=DIR  # (设置要使用的Chrome用户数据目录。)
--server=SERVER  # (测试使用的服务器/ IP地址。)
--port=PORT  # (测试设备使用的端口测试服务器。)
--proxy=SERVER:PORT  #(这是测试使用的代理服务器:端口组合。)
--agent=STRING  #(这指定要使用的Web浏览器的用户代理。)
--mobile  # (使用移动模拟器运行测试。)
--metrics=STRING  # (用于移动模拟器测试的“ CSSWidth,Height,PixelRatio”。)
--extension-zip=ZIP  # (加载Chrome扩展程序.zip文件,以逗号分隔。)
--extension-dir=DIR  # (加载Chrome扩展程序目录,以逗号分隔。)
--headless  # (无头运行测试的选项。LinuxOS   上的默认设置。)
--headed  #(在Linux OS上使用GUI运行测试的选项。)
--start-page=URL  # (测试开始时Web浏览器的起始URL。)
--log-path=LOG_PATH  # (获取日志文件的目录保存到。)
--archive-logs  # (归档旧日志文件,而不是删除它们。)
--slow  # (降低自动化速度的选项。)
--demo  # (选择在发生测试行为时直观地查看的选项)。)
--demo-sleep=SECONDS  # (在“演示模式”操作后等待更长时间的选项。)
--highlights=NUM  # (演示模式操作的突出显示动画的数量。)
--message-duration=SECONDS  # (Messenger警报的时间长度。)
--check-js  #(用于在页面加载后检查JavaScript错误的选项。)
--ad-block  #(在页面加载后阻止某些展示广告的选项。)
--verify-delay=SECONDS  # (MasterQA验证检查之前的延迟。)
--disable-csp  # (这将禁用网站的内容安全策略。)
--enable-sync  #(启用“ Chrome Sync”的选项。)
--reuse-session  #(在测试之间重用浏览器会话的选项。)
--maximize-window  #(最大化从Web浏览器启动的选项。)
--save-screenshot  #(每次测试后保存屏幕截图的选项。)
--visual-baseline  #(设置Visual / Visual基线)布局测试。)
--timeout-multiplier=MULTIPLIER  # (乘以默认超时值。)
详细方法说明和示例:
导航到网页( 以及相关命令)
self.open("https://xkcd.com/378/")
# This method opens the specified page.self.go_back()
# This method navigates the browser to the previous page.self.go_forward()
# This method navigates the browser forward in history.self.refresh_page()
# This method reloads the current page.self.get_current_url()
# This method returns the current page URL.self.get_page_source()
# This method returns the current page source.
( 你可能需要对 python 编程技巧进行复习。) 例如:
source =self.get_page_source()
first_image_open_tag = source.find('<img>')
first_image_close_tag = source.find'</img>', first_image_open_tag)
everything_inside_first_image_tags = source[first_image_open_tag+len('<img>'):first_image_close_tag]
点击单击页面上的某个元素:
self.click("div#my_id")
键入文本self.update_text(selector, text) # 使用指定值更新指定元素中的文本。 如果元素丢失或者文本字段不可编辑,则引发异常。 例如:
self.update_text("input#id_value", "2012")
如果已经有文本 inside,也可以使用 self.add_text() 或者 WebDriver. send_keys() 命令,但这些命令将不会首先清除文本框。 如果你想输入特殊的键,那也很容易。 下面是一个示例:
from selenium.webdriver.common.keys import Keys
self.find_element("textarea").send_keys(Keys.SPACE+ Keys.BACK_SPACE+'n')
# the backspace should cancel out the space, leaving you with the newline
从页面上的元素获取文本
text =self.get_text("header h2")
从页面上的元素获取属性值
attribute =self.get_attribute("#comic img", "title")
在某些秒内,在页面上断言元素存在:
self.wait_for_element_present("div.my_class", timeout=10)
( 注:你也可以使用: self.assert_element_present(ELEMENT) )
self.wait_for_element_visible("a.my_class", timeout=5)
( 注意:这里的短版本是 self.find_element(ELEMENT) 和 self.assert_element(ELEMENT)。 find_element() 版本返回元素)
由于行 上面 返回元素,因此可以将它的与. click() 结合使用,如下所示:
self.find_element("a.my_class", timeout=5).click()
# But you're better off using the following statement, which does the same thing:self.click("a.my_class")
# DO IT THIS WAY!
(div.class_name) 作为CSS选择器中 div[class="class_name"]的简化版本。
你还可以使用 *= 在CSS选择器中搜索任何部分值,如下面的below 所示:
self.click('a[name*="partial_name"]')
self.wait_for_text_visible("Make it so!", "div#trek div.picard div.quotes", timeout=3)
self.wait_for_text_visible("Tea. Earl Grey. Hot.", "div#trek div.picard div.quotes", timeout=1)
( 注意:这里的短版本是 self.find_text(TEXT, ELEMENT) 和 self.assert_text(TEXT, ELEMENT) )
self.assertTrue(myvar1 == something)
self.assertEqual(var1, var2)
有用的条件语句( 带有创造性的范例)
is_element_visible(selector) # 是页面上可见的元素
import logging

if self.is_element_visible('div#warning'):
    logging.debug("Red Alert: Something bad might be happening!")
is_element_present(selector) # 是页面上存在的元素
if self.is_element_present('div#top_secret img.tracking_cookie'):
    self.contact_cookie_monster() # Not a real method unless you define it somewhere
else:
    current_url =self.get_current_url()
    self.contact_the_nsa(url=current_url, message="Dark Zone Found") # Not a real method unless you define it somewhere
另一个例子:
def is_there_a_cloaked_klingon_ship_on_this_page():
    if self.is_element_present("div.ships div.klingon"):
        return not self.is_element_visible("div.ships div.klingon")
    return False
is_text_visible ( 文本,选择器) # 在页面上可见
def get_mirror_universe_captain_picard_superbowl_ad(superbowl_year):
    selector = "div.superbowl_%s div.commercials div.transcript div.picard" % superbowl_year
    if self.is_text_visible("For the Love of Marketing and Earl Grey Tea!", selector):
        return "Picard HubSpot Superbowl Ad 2015"
    elif self.is_text_visible("Delivery Drones... Engage", selector):
        return "Picard Amazon Superbowl Ad 2015"
    elif self.is_text_visible("Bing it on Screen!", selector):
        return "Picard Microsoft Superbowl Ad 2015"
    elif self.is_text_visible("OK Glass, Make it So!", selector):
        return "Picard Google Superbowl Ad 2015"
    elif self.is_text_visible("Number One, I've Never Seen Anything Like It.", selector):
        return "Picard Tesla Superbowl Ad 2015"
    elif self.is_text_visible("""With the first link, the chain is forged.
                              The first speech censored, the first thought forbidden,
                              the first freedom denied, chains us all irrevocably.""", selector):
        return "Picard Wikimedia Superbowl Ad 2015"
    elif self.is_text_visible("Let us make sure history never forgets the name ... Facebook", selector):
        return "Picard Facebook Superbowl Ad 2015"
    else:
        raise Exception("Reports of my assimilation are greatly exaggerated.")
切换选项卡如果测试打开了新的选项卡/窗口,而现在又有了多个页面? 没有问题你需要指定当前希望 selenium 使用哪一个。 在标签/Windows 之间切换很简单: 比如:
self.switch_to_window(1) # This switches to the new tab (0 is the first one)
self.switch_to_frame('ContentManagerTextBody_ifr')
# Now you can act inside the iFrame
#.. .. Do something cool (here)self.switch_to_default_content()
# exit the iFrame when you're done
处理弹出警报如果你的测试在浏览器中弹出了一个警告,该怎么办? 没有问题你需要向它 switch,并接受它或者取消它: 比如:
self.wait_for_and_accept_alert()
self.wait_for_and_dismiss_alert()
如果你不确定在接受或者取消之前是否有警报,那么一种处理通知处理代码的方法是 block。 其他方法( 如. text 和. send_keys() ) 也可以使用警报。
执行定制的jQuery脚本:jQuery是一个强大的JavaScript库,允许你在网页浏览器中执行高级操作。 如果已经加载了网页,那么你可以立即开始执行jQuery脚本。 你可以知道,因为web页面将包含以下HTML中的类似以下内容:
<scriptsrc="http://ajax.googleapis.com/ajax/libs/jquery/1/jquery.min.js"></script>
如果你想在没有加载它的页面上使用 jQuery,那就没关系了。 为此,请先运行以下命令:
self.activate_jquery()
以下是在你的脚本中使用jQuery的一些示例:
self.execute_script('jQuery, window.scrollTo(0, 600)')  # Scrolling the page

self.execute_script("jQuery('#annoying-widget').hide()")  # Hiding elements on a page

self.execute_script("jQuery('#hidden-widget').show(0)")  # Showing hidden elements on a page

self.execute_script("jQuery('#annoying-button a').remove()")  # Removing elements on a page

self.execute_script("jQuery('%s').mouseover()" % (mouse_over_item))  # Mouse-over elements on a page

self.execute_script("jQuery('input#the_id').val('my_text')")  # Fast text input on a page

self.execute_script("jQuery('div#dropdown a.link').click()")  # Click elements on a page

self.execute_script("return jQuery('div#amazing')[0].text")  # Returns the css "text" of the element given

self.execute_script("return jQuery('textarea')[2].value")  # Returns the css "value" of the 3rd textarea element on the page
在下面的示例中,javascript用于在页面上设置代码,selenium 随后可以触摸该代码:
start_page = "https://xkcd.com/465/"
destination_page = "https://github.com/seleniumbase/SeleniumBase"
self.open(start_page)
referral_link = '''<a class='analytics test' href='%s'>Free-Referral Button!</a>''' % destination_page
self.execute_script('''document.body.innerHTML = \"%s\"''' % referral_link)
self.click("a.analytics")  # Clicks the generated button
使用非终止验证:假设你希望在一个测试中验证多个不同的元素,但是在验证了多个元素之前,你不需要重新运行测试。 那就是页面检查的地方。 下面是示例:
from seleniumbase import BaseCase

class MyTestClass(BaseCase):

    def test_delayed_asserts(self):
        self.open('https://xkcd.com/993/')
        self.wait_for_element('#comic')
        self.delayed_assert_element('img[alt="Brand Identity"]')
        self.delayed_assert_element('img[alt="Rocket Ship"]')  # Will Fail
        self.delayed_assert_element('#comicmap')
        self.delayed_assert_text('Fake Item', '#middleContainer')  # Will Fail
        self.delayed_assert_text('Random', '#middleContainer')
        self.delayed_assert_element('a[name="Super Fake !!!"]')  # Will Fail
        self.process_delayed_asserts()
check_assert_element() 和 check_assert_text() 将保存任何将引发的异常。 要将所有失败检查都清除为单个异常,请确保在测试方法的末尾调用 self.process_checks()。 如果测试点击多页,则可以在所有检查的结尾调用 self.process_checks()。 这样,日志文件的屏幕截图将使检查的位置成为。
self.driver.delete_all_cookies()
capabilities = self.driver.capabilities
self.driver.find_elements_by_partial_link_text("GitHub")
( 通常,当可用时,你需要使用SeleniumBase版本的方法。)
假设你有一个发送电子邮件的测试,现在你想检查电子邮件是否已经收到:
from seleniumbase.fixtures.email_manager import EmailManager, EmailException
num_email_results =0
email_subject ="This is the subject to search for (maybe include a timestamp)"
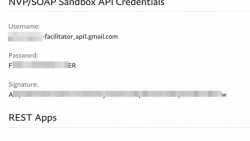
email_manager = EmailManager("[YOUR SELENIUM GMAIL EMAIL ADDRESS]")
# the password for this is elsewhere (in the library) because this is a default email account
try:
html_text = email_manager.search(SUBJECT="%s"% email_subject, timeout=300)
num_email_results =len(html_text)
except EmailException:
num_email_results =0
self.assertTrue(num_email_results) # true if not zero
如果你正在寻找特定的文本或者导航到那里列出的链接,你可以通过电子邮件进行分析。
假设你有一个需要访问数据库的测试。 首先确保已经准备好了 table。 然后尝试以下示例:
from seleniumbase.core.mysql import DatabaseManager

def write_data_to_db(self, theId, theValue, theUrl):
    db = DatabaseManager()
    query ="""INSERT INTO myTable(theId,theValue,theUrl) VALUES (%(theId)s,%(theValue)s,%(theUrl)s)"""
    db.execute_query_and_close(query, {"theId":theId, "theValue":theValue,"theUrl":theUrl})
访问凭据在 settings.py 中存储,以便你方便。
以下示例 below (。从延迟的数据管理器获取) 显示如何从数据库中提取数据。
import loggingfrom seleniumbase.core.mysql
import DatabaseManager

def get_delayed_test_data(self, testcase_address, done=0):
    """ Returns a list of rows """

    db = DatabaseManager()
    query ="""SELECT guid,testcaseAddress,insertedAt,expectedResult,done FROM delayedTestData WHERE testcaseAddress=%(testcase_address)s AND done=%(done)s"""
    data = db.fetchall_query_and_close(query, {"testcase_address":testcase_address, "done":done})

    if data:
        return data
    else:
         logging.debug("Could not find any rows in delayedTestData.")
         logging.debug("DB Query = "+ query % {"testcase_address":testcase_address, "done":done})
         return []
现在你知道如何从你的MySQL数据库中提取数据了。
延迟的数据管理器用法示例: 你可以在电子邮件主题的当前时间内设置电子邮件,并且你可以在数据库( 随着时间的推移,电子邮件的安全搜索) 中保存电子邮件凭据,然后在以后的运行测试中保存电子邮件凭据。
![]()
Related Posts

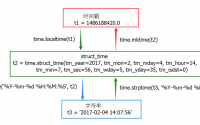
Python: 时间处理, 时间戳, 日期格式化, 日期和时间戳互相转换, 时间模块, 日期模块, time, date, php timestamp(10位和13位)
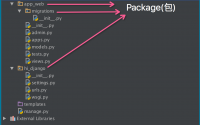
Python导入模块的几种姿势, Python导入的路径, 绝对导入, 相对导入, 模块加载和路径查找, python import 路径