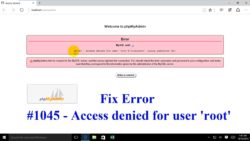
在使用phpMyAdmin操作数据库时,首先需要设置mysql的root用户的密码。具体操作参考前一篇博文。设置完mysql的root密码之后,需要对phpMyAdmin的登录进行一些配置。 未经配置的phpMyAdmin很不安全,容易受到攻击,或者根本无法正常使用,phpMyAdmin有3种授权模式: cookie: 显示一个web登录页面,输入mysql的用户名和密码,然后进入管理界面 http: 显示1个windows登录框,输入mysql的用户名和密码,然和进入管理 config: 把mysql用户名和密码直接填入config.inc.php,不显示登录界面,直接进入管理界面 …
May 31, 2018
phpmyadmin: 通过htaccess和htpasswd设置弹出登录窗口, PhpMyAdmin两步验证, Add an Extra Layer of Security, PhpMyAdmin Login Interface
第一步:添加下面的代码到 /etc/apache2/sites-available/000-default.conf 或者 /etc/httpd/conf/httpd.conf
Add these lines to the Apache configuration file (/etc/apache2/sites-available/000-default.conf or /etc/httpd/conf/httpd.conf):
/etc/apache2/sites-available/000-default.conf – On Ubuntu
<Directory /usr/share/phpmyadmin>
AuthType Basic
AuthName "Restricted Content"
AuthUserFile /etc/apache2/.htpasswd # or/etc/phpmyadmin/.htpasswd
Require valid-user
</Directory>
/etc/httpd/conf/httpd.conf – On CentOS
<Directory /usr/share/phpmyadmin>
AuthType Basic
AuthName "Restricted Content"
AuthUserFile /etc/httpd/.htpasswd
Require valid-user
</Directory>
第二步:使用 htpasswd 命令创建一个用户和密码
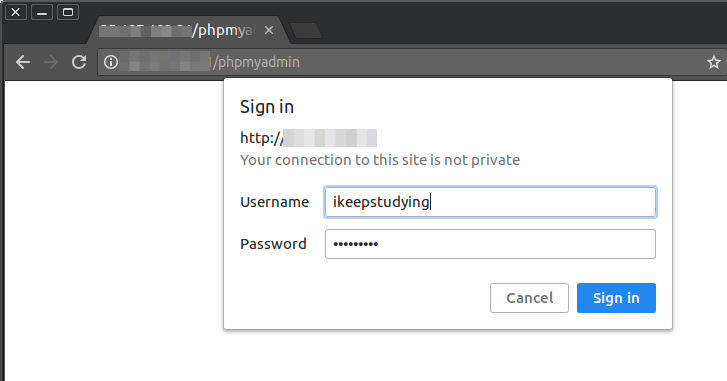
Then use htpasswd to generate a password file for an account that will be authorized to access the phpmyadmin login page. We will use /etc/apache2/.htpasswd and ikeepstudying in this case:
#---------- On Ubuntu/Debian Systems ----------
sudo htpasswd -c /etc/apache2/.htpasswd  ikeepstudying

#---------- On CentOS/RHEL Systems ----------
sudo htpasswd -c /etc/httpd/.htpasswd ikeepstudying
然后他会提示你输入密码,二次输入你的密码即可!Enter password twice and then change the permissions and ownership of the file.
注意:AuthUserFile 需要 apache2-utils 支持,如果没有的话,通过下面的命令安装:
sudo apt-get install apache2-utils
第三步:修改 .htpasswd 文件的权限和组,因为Ubuntu 匿名用户是 www-data CentOS匿名用户是 apache
This is to prevent anyone not in the www-data or apache group from being able to read .htpasswd:
sudo chmod 640 /etc/apache2/.htpasswd

#---------- On Ubuntu/Debian Systems ----------
sudo chgrp www-data /etc/apache2/.htpasswd

#---------- On CentOS/RHEL Systems ----------
sudo chgrp apache /etc/httpd/.htpasswd
最后打开网址,检查一下:
Go to http://<ip address>/phpmyadmin and you’ll see the authentication dialog before accessing the login page.
注意:没有出现的话,也可以尝试重启apache:
sudo service apache2 restart
拓展:htpasswd 用法
htpasswd命令是Apache的Web服务器内置工具,用于创建和更新储存用户名、域和用户基本认证的密码文件。
语法
htpasswd(选项)(参数)
htpasswd [-cmdpsD] passwordfile username
htpasswd -b[cmdpsD] passwordfile username password
htpasswd -n[mdps] username
htpasswd -nb[mdps] username password
选项
–c 创建一个加密文件
–n 不更新加密文件,只将apache htpasswd命令加密后的用户名密码显示在屏幕上
–m 默认apache htpassswd命令采用MD5算法对密码进行加密
–d apache htpassswd命令采用CRYPT算法对密码进行加密
–p apache htpassswd命令不对密码进行进行加密,即明文密码
–s apache htpassswd命令采用SHA算法对密码进行加密
–b 在apache htpassswd命令行中一并输入用户名和密码而不是根据提示输入密码
–D 删除指定的用户
在Windows, NetWare and TPF 系统中-m选项是默认的,在使用apache htpasswd命令时可以忽略。在其他系统中-p选项可能不能工作。
参数
- 用户:要创建或者更新密码的用户名;
- 密码:用户的新密码。
实例
1.htpasswd命令添加用户
htpasswd -bc .passwd ikeepstuding pass //当前目录下生成一个.passwd文件,用户名ikeepstuding ,密码:pass,默认采用MD5加密方式
2.在原有密码文件中增加新用户
htpasswd -b .passwd justcode pass //去掉c选项,即可在第一个用户之后添加第二个用户,依此类推
3.不更新密码文件,只显示加密后的用户名和密码
htpasswd -nb ikeepstuding pass //不更新.passwd文件,只在屏幕上输出用户名和经过加密后的密码
4.删除用户名和密?
htpasswd -D .passwd ikeepstuding
5.利用htpasswd命令修改密码
htpasswd -b .passwd ikeepstuding pass //直接使用第2种新增用户的方法,ikeepstuding为原有用户,pass为新密码,不需要用下面删除再新建用户!!
# htpasswd -D .passwd ikeepstuding
# htpasswd -b .passwd ikeepstuding pass
#即先使用htpasswd删除命令删除指定用户,再利用htpasswd添加用户命令创建用户即可实现修改密码的功能
本文:phpmyadmin: 通过htaccess和htpasswd设置弹出登录窗口, Add an Extra Layer of Security, PhpMyAdmin Login Interface
![]()
Related Posts

React Hooks 入门教程, Hook API 索引, 基础 Hook, useState, useEffect, useContext, useRef, useReducer

PHP获取浏览器信息, How to Parse a User Agent in PHP with Minimal Effort

PHP大批量插入数据库或者大批量更新数据库的方法
About Author
Gideon
One Comment