什么是pom? pom作为项目对象模型。通过xml表示maven项目,使用pom.xml来实现。主要描述了项目:包括配置文件;开发者需要遵循的规则,缺陷管理系统,组织和licenses,项目的url,项目的依赖性,以及其他所有的项目相关因素。 快速察看: xml 代码 <project> <modelVersion>4.0.0</modelVersion> <groupId>...</groupId> <artifactId>...</artifactId>…
Java: maven assembly插件使用, maven打包jar, maven打包依赖包
主页:https://maven.apache.org/plugins/maven-assembly-plugin/usage.html
主页实例:
<plugin>
    <artifactId>maven-assembly-plugin</artifactId>
    <version>3.1.0</version>
    <configuration>
        <archive>
            <manifest>
                <mainClass>com.ikeepstudying.justcode.Main</mainClass>
            </manifest>
        </archive>
        <descriptorRefs>
            <descriptorRef>jar-with-dependencies</descriptorRef>
        </descriptorRefs>
    </configuration>
    <executions>
        <execution>
            <id>make-assembly</id> <!-- this is used for inheritance merges -->
            <phase>package</phase> <!-- bind to the packaging phase -->
            <goals>
                <goal>single</goal>
            </goals>
        </execution>
    </executions>
</plugin>
打包命令:
mvn clean package
执行命令:
java -jar ××××-with-dependencies.jar
当你使用 Maven 对项目打包时,你需要了解以下 3 个打包 plugin,它们分别是
| plugin | function |
|---|---|
| maven-jar-plugin | maven 默认打包插件,用来创建 project jar |
| maven-shade-plugin | 用来打可执行包,executable(fat) jar |
| maven-assembly-plugin | 支持定制化打包方式,例如 apache 项目的打包方式 |
下面我们就简单介绍一下 maven-assembly-plugin。
首先,在pom.xml中<plugin></plugin>中添加assembly插件。
<plugin>
    <groupId>org.apache.maven.plugins</groupId>
    <artifactId>maven-assembly-plugin</artifactId>
    <version>x.x.x</version>
    <configuration>
        ...
    </configuration>
    <executions>
        <execution>
            ...
        </execution>
    </executions>
</plugin>
<execution></execution>中设置maven的某个生命周期与插件的那个目标相互绑定,常规配置如下:
<execution>
    <id>assembly</id>
    <phase>package</phase>
    <goals>
        <goal>single</goal>
    </goals>
</execution>
<configuration></configuration>中重要的配置有如下几项:
(1) 设置assembly的打包细节:
这个是assembly的关键配置,assembly给出了一种自带的打包方式,配置如下:
<configuration>
    <descriptorRefs>
        <descriptorRef>jar-with-dependencies</descriptorRef>
    </descriptorRefs>
    ...
</configuration>
这种方式打出的包是fat jar,也就是把依赖的jar包全部解压成class文件后,再与自己的代码打成一个jar包。
还有一种方式就是自定义打包,这种方式需要创建一个打包的配置文件:
<configuration>
    <descriptors>
        <descriptor>src/main/resources/assembly.xml</descriptor>
    </descriptors>
    ...
</configuration>
这个文件的路径及名称都可以自己指定的,lz这里命名为assembly.xml,格式如下:
<assembly xmlns="http://maven.apache.org/plugins/maven-assembly-plugin/assembly/1.1.3"           xmlns:xsi="http://www.w3.org/2001/XMLSchema-instance"           xsi:schemaLocation="http://maven.apache.org/plugins/maven-assembly-plugin/assembly/1.1.3 http://maven.apache.org/xsd/assembly-1.1.3.xsd">
    ...
</assembly>
第一个属性是<id></id>,但是lz不知道它的作用,随便起了个名字。
第二个属性是<formats></formats>,这个用来指定打包的类型,支持以下类型
-
-
- “zip” – Creates a ZIP file format
- “tar” – Creates a TAR format
- “tar.gz” or “tgz” – Creates a gzip’d TAR format
- “tar.bz2” or “tbz2” – Creates a bzip’d TAR format
- “jar” – Creates a JAR format
- “dir” – Creates an exploded directory format
- “war” – Creates a WAR format
-
lz使用过zip、jar和dir(也就是输出到文件夹),都是好用的(貌似也支持同时定义多种格式,但是lz没尝试过),配置格式如下:
<formats>
    <format>jar</format>
</formats>
第三个属性是<includeBaseDirectory></includeBaseDirectory>,设置为true的话,会把指定打包的内容外在嵌套一个文件夹,没什么用处,所以lz都设置为false。
第四第五个属性都是来指定打包内容的,<fileSets></fileSets>用来设置所要打包的文件夹,<dependencySets></dependencySets>用来设置所要打包的依赖包。举个例子来说,lz想要把自己编写的代码编译后的class文件以及所需的依赖包的class文件打到jar包中,要如下设置:
<fileSets>
    <fileSet>
        <directory>${project.basedir}/target/classes/</directory>
        <outputDirectory>/</outputDirectory>
        <includes>
            <include>/**/*.class</include>
            <include>*.xml</include>
            <include>*.properties</include>
            <include>*.yaml</include>
        </includes>
    </fileSet>
</fileSets>
<dependencySets>
    <dependencySet>
        <outputDirectory>/</outputDirectory>
        <includes>
            <include>org.yaml:snakeyaml</include>
        </includes>
        <unpack>true</unpack>
    </dependencySet>
</dependencySets>
<directory></directory>指定所需打包内容所在文件夹,当然依赖就不用设置这个了。
<outputDirectory></outputDirectory>指定输出目录,lz在根目录输出,就设置为/。
<includes></includes>用来指定要打包的文件,不设置的话就全部都打包。还有一个与之对应的<excludes></excludes>,指定不被打入的文件。
<unpack></unpack>这个是依赖特有的,用来设置依赖包是否解压。true解压,就是以class的形式出现。false不解压,是以jar包的形式出现。但如果不解压的话,一般将依赖包放在执行包的外边,这样配置:
<formats>
    <format>dir</format>
</formats>
<includeBaseDirectory>false</includeBaseDirectory>
<dependencySets>
    <dependencySet>
        <outputDirectory>lib</outputDirectory>
        <excludes>
            <exclude>org.yaml:snakeyaml</exclude>
        </excludes>
    </dependencySet>
</dependencySets>
将format设置为dir,这样就将jar输出到可执行jar包的外面。lz指定在了dir文件夹下。
(2) 设置assembly打包的命名:
<appendAssemblyId></appendAssemblyId>来设置打出的包是否带有AssemblyId(也就是assembly.xml中设置的id)后缀。很好理解,但是这里有一点要特别注意:如果设置为false并且你要打出的包包括jar包的话,它会覆盖默认打出的包。这是因为在maven的打包阶段,还有一个插件也在执行,它就是maven-jar-plugin。它也会打出一个jar包,这个jar包就是你coding出的代码编译后的包。所以你要是想要那个包的话,要将这个值设置为true。
(3) 设置jar执行时的MANIFEST.MF:
MANIFEST.MF这个文件的作用就不多说了,在这里有两个配置是最主要的:mainclass和classpath,配置如下:
<archive>
    <manifest>
        <addClasspath>true</addClasspath>
        <classpathPrefix>lib/</classpathPrefix>
        <mainClass>com.pxene.dmp.main.JobManager</mainClass>
    </manifest>
</archive>
这里有一点要特别注意:因为assembly执行在package阶段,它所关联的依赖包的scope只是compile的,所以runtime阶段的jar包不会被指定在classpath下面(这个lz纠结了好久,才找到原因),所以lz把所有执行时期的依赖也设置为compile了。这种方式不太好,但是也没想到更好的解决方法。
描述符文件元素
id
<id>release</id>
id 标识符,添加到生成文件名称的后缀符。如果指定 id 的话,目标文件则是 ${artifactId}-${id}.tar.gz
formats
maven-assembly-plugin 支持的打包格式有zip、tar、tar.gz (or tgz)、tar.bz2 (or tbz2)、jar、dir、war,可以同时指定多个打包格式
  <formats>
    <format>tar.gz</format>
    <format>dir</format>
  </formats>
dependencySets
用来定制工程依赖 jar 包的打包方式,核心元素如下表所示。
| 元素 | 类型 | 作用 |
|---|---|---|
| outputDirectory | String | 指定包依赖目录,该目录是相对于根目录 |
| includes/include* | List<String> | 包含依赖 |
| excludes/exclude* | List<String> | 排除依赖 |
<dependencySets>
    <dependencySet>
      <outputDirectory>/lib</outputDirectory>
    </dependencySet>
  </dependencySets>
fileSets
管理一组文件的存放位置,核心元素如下表所示。
| 元素 | 类型 | 作用 |
|---|---|---|
| outputDirectory | String | 指定文件集合的输出目录,该目录是相对于根目录 |
| includes/include* | List<String> | 包含文件 |
| excludes/exclude* | List<String> | 排除文件 |
| fileMode | String | 指定文件属性,使用八进制表达,分别为(User)(Group)(Other)所属属性,默认为 0644 |
<fileSets>
    <fileSet>
      <includes>
        <include>bin/**</include>
      </includes>
      <fileMode>0755</fileMode>
    </fileSet>

    <fileSet>
      <includes>
        <include>/conf/**</include>
        <include>logs</include>
      </includes>
    </fileSet>

  </fileSets>
files
可以指定目的文件名到指定目录,其他和 fileSets 相同,核心元素如下表所示。
| 元素 | 类型 | 作用 |
|---|---|---|
| source | String | 源文件,相对路径或绝对路径 |
| outputDirectory | String | 输出目录 |
| destName | String | 目标文件名 |
| fileMode | String | 设置文件 UNIX 属性 |
 <files>
    <file>
      <source>README.txt</source>
      <outputDirectory>/</outputDirectory>
    </file>
  </files>
样例
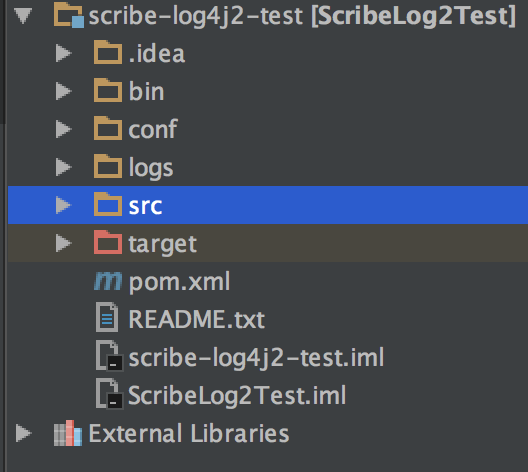
工程目录结构

pom.xml
<build>
  <finalName>scribe-log4j2-test</finalName>
  <plugins>
    <plugin>
      <groupId>org.apache.maven.plugins</groupId>
      <artifactId>maven-compiler-plugin</artifactId>
    </plugin>

    <plugin>
      <groupId>org.apache.maven.plugins</groupId>
      <artifactId>maven-assembly-plugin</artifactId>
      <configuration>
        <descriptors>
          <descriptor>src/main/assembly/release.xml</descriptor>
        </descriptors>
      </configuration>

      <executions>
        <execution>
          <id>make-assembly</id> <!-- this is used for inheritance merges -->
          <phase>package</phase> <!-- bind to the packaging phase -->
          <goals>
            <goal>single</goal>
          </goals>
        </execution>
      </executions>
    </plugin>
  </plugins>
</build>
release.xml
<assembly xmlns="http://maven.apache.org/plugins/maven-assembly-plugin/assembly/1.1.3"
          xmlns:xsi="http://www.w3.org/2001/XMLSchema-instance"
          xsi:schemaLocation="http://maven.apache.org/plugins/maven-assembly-plugin/assembly/1.1.3 http://maven.apache.org/xsd/assembly-1.1.3.xsd">

  <formats>
    <format>tar.gz</format>
    <format>dir</format>
  </formats>

  <dependencySets>
    <dependencySet>
      <outputDirectory>/lib</outputDirectory>
    </dependencySet>
  </dependencySets>

  <fileSets>
    <fileSet>
      <includes>
        <include>bin/**</include>
      </includes>
      <fileMode>0755</fileMode>
    </fileSet>

    <fileSet>
      <includes>
        <include>/conf/**</include>
        <include>logs</include>
      </includes>
    </fileSet>

  </fileSets>

  <files>
    <file>
      <source>README.txt</source>
      <outputDirectory>/</outputDirectory>
    </file>
  </files>

</assembly>
最终创建生成可执行二进制工程
参考
maven 入门指南
maven 生命周期
Maven 默认插件以及功能
maven 依赖管理
maven-shade-plugin 入门指南
maven-assembly-plugin
本文: Java: maven assembly插件使用, maven打包jar, maven打包依赖包
![]()


